Python LXML 安装步骤
1. 从 Ubuntu 软件包更新开始:
让我们在 Ubuntu 上运行 system update 命令,以确保系统软件包是最新的,并且我们的系统上也安装了最新的安全更新。因此,打开终端并运行:
sudo apt update虽然不需要安装 LXML,但如果需要,也可以运行 system upgrade 命令。
sudo apt upgrade2. 安装依赖:
lxml 需要一些工具和库才能正常工作。运行给定的命令,该命令将安装 Python3 以及 libxml2 和 libxslt 的开发文件
sudo apt install libxml2-dev libxslt-dev python3-dev python33. 使用 pip 安装 lxml:
安装 lxml 的推荐方法是通过 Python 的包安装程序 pip。如果您还没有安装 PIP,请在给定的命令之后使用 – “sudo apt install python3-pip”。
pip3 install lxml此命令将从 Python 包索引 (PyPI) 下载并安装最新版本的 lxml。
4. 验证安装:
完成 LXML for Python 的安装后,我们可以使用 Python 命令来确保 LXML 安装正确。给定的命令将打印LXML的版本,显示我们在系统上已将其保存并正确配置。
python3 -c "import lxml; print(lxml.__version__)"5. 在 Python3 中使用 LXML 的示例
众所周知,Python 中 LXML 库用于解析 XML 和 HTML 文档,因此在这里我们向您展示如何使用 LXML 解析 XML 文件以提取或操作文件数据。
示例:
创建 XML 文件:
nano demo.xml粘贴以下代码并按 Ctrl+X 保存文件,键入 Y,然后按 Enter 键。
<library>
    <book>
        <title>Learning Python</title>
        <author>Mark Lutz</author>
        <year>2013</year>
    </book>
    <book>
        <title>Automate the Boring Stuff with Python</title>
        <author>Al Sweigart</author>
        <year>2015</year>
    </book>
</library>
接下来,我们创建一个 Python 脚本,该脚本将在上面创建的 XML 文件中添加新的书籍数据。
nano book.py粘贴代码并保存文件:
from lxml import etree

# Load and parse the XML file
tree = etree.parse('demo.xml')

# Get the root element
root = tree.getroot()

# Print out the title of each book
print("Book Titles in the Library:")
for book in root.findall('book'):
    title = book.find('title').text
    print(title)

# Add a new book to the library
new_book = etree.SubElement(root, "book")
title = etree.SubElement(new_book, "title")
title.text = "Python Crash Course"
author = etree.SubElement(new_book, "author")
author.text = "Eric Matthes"
year = etree.SubElement(new_book, "year")
year.text = "2016"

# Save the modified XML to a new file
tree.write('modified_library.xml', pretty_print=True, xml_declaration=True, encoding="UTF-8")

print("\nA new book has been added to the library and saved to 'modified_library.xml'.")
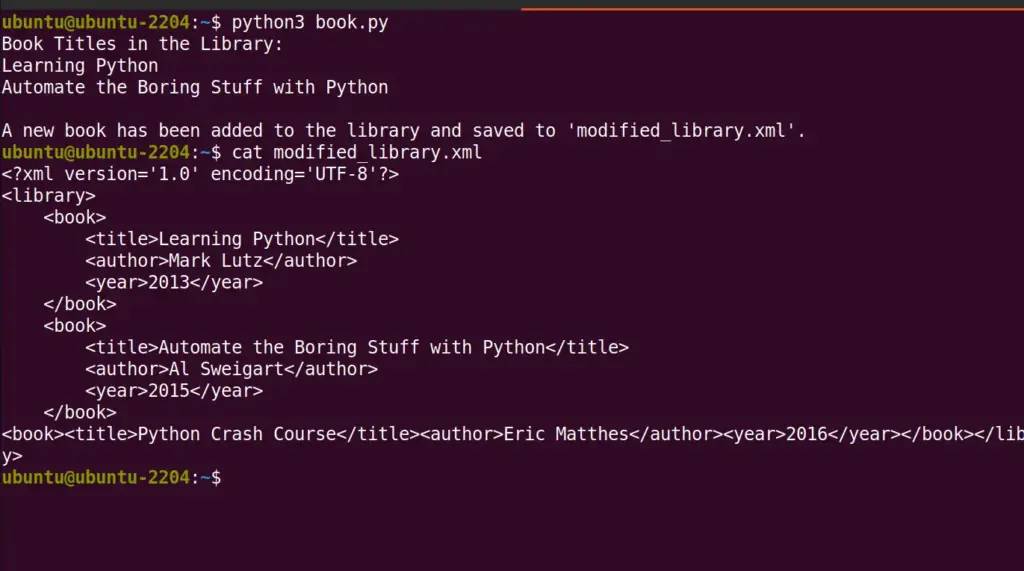
运行上面创建的 Python 脚本:
python3 book.py现在,如果您检查新创建的 XML 文件,即“modified_library.xml”,您将看到

有关 LXML 用法的更多详细信息,用户可以参考官方 lxml 文档页面。
 33台词网
33台词网